With pretty much all satyr costumes they are either shirtless or with a vest and scarf. Here in Idaho it gets pretty cold, so I was thinking of making variations and layers to the satyr costume, but for now, a nice fabric.
 |
| I arm myself whenever I go to craft stores...or Wal-Mart |
Now, word of advice? Never pay full price for patterns. Patterns that cost you anywhere from $15 to $20 only end up costing $0.99 on certain sale days with a limit of 10 patterns per visit, and they have those sale days like candy. I like to look at patterns online, write the number down on a piece of paper, and then go to the fabric store and get what I want because, plainly put, any craft stores are Hell where old ladies and screaming children reside (I wonder, do the screaming children eventually cocoon themselves in quilt batting and emerge next spring as the old ladies?)
 |
| You can tell I'm totally stoked to do this. |
Okay, so after arming myself with various blades and smoke bombs I head out and return with the vest pattern of choice and the sheep/Bambi fabric I had seen earlier (Shambi?)
This pattern is pretty simple (It's Simplicity 2346, in case you want to know.) Even the pattern packaging itself nearly screams "Even you can do this, you moron!" and I go "Woo! Failure!" and begin.
I have never made anything from total scratch. Usually I'll buy a pattern and then the fabric somehow cut itself into the desired shape, so that all I had to do was stitch it together. After fumigating for Fabric Elves I later realized it was my mom.
 |
| Which is pretty much what I say when a guy is close by. |
Most of the time I work with darker fabrics, so this was a nice change. The instructions said to pin the pattern onto the fabric, but that stuff is thinner than onion skin, and I've always been afraid of tearing it. Instead I took a pen to the fabric and drew lines while the pattern lay on it. Unfortunately drawing on fabric makes the pen unreliable. It wasn't long before I had given up on it. Luckily I had some washable fabric-marking pens I had bought for an earlier project and used those instead. The whole time saying "Don't screw up don't screw up don't screw up."
 |
| And that's why I'm not God. |
I managed to get the pieces all cut out, making absolutely sure I didn't accidentally draw down the middle of the backside vest piece. Even better, I found the grain of the fabric. The grain is how the fabric lays, and while I couldn't find it on the suede side, I found it on the woolly side, so when you pet it in a down stroke, the fabric lays in a downward-with-gravity-position. Without it, it would be weird, like imagine petting a dog and his fur lays so that you have to pet him from tail to head for the hair to lay right.
 |
| Like maybe a big square. Yeah, that would be a great project! |
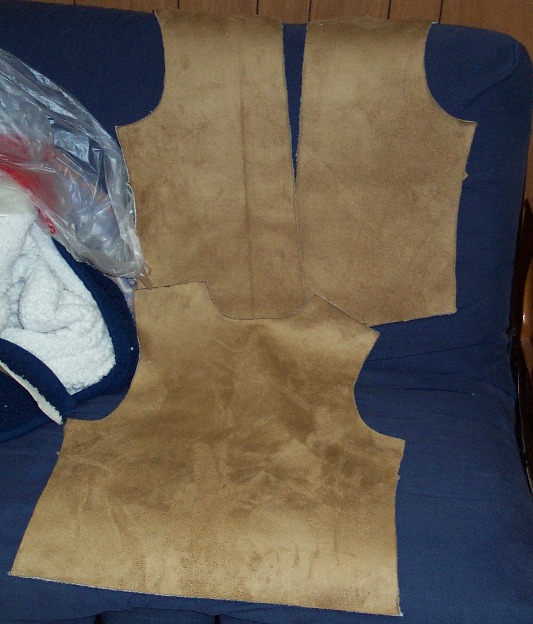
Now, this picture here should give you an idea of how much of a noob I am at sewing. I have no idea how to read the backs of patters, where they tell you how much of what you need. Fabric, liner, bias tape, I can't read it. This huge chunk of fabric? I honestly thought I needed all of it. All of it for one vest. After cutting this one out it actually looks like I could make a total of three vests. Anyone who sews should be tearing their hair out right about now. Still, I'll see about finding some non vest-related project for the leftovers in the future.
 |
| From that moment on it haunted my nightmares. |
I first sew one of the shoulder pieces, make an awesome turn on my sewing machine, and promptly sew the armhole shut. It takes much longer to undo the stitching, and in the meantime I'm wondering how in the world I manage to even clothe myself in the morning. After redoing the sewing correctly I manage to put the whole thing together without another hitch. It took about three hours in total (an hour of which was trying to cut the pattern out of the paper and goofing off.) It looks amazing, but when my brother tries it on something doesn't feel right. The whole thing swings out wonky and there are the corners at the top where the front pieces come together at the center. I'm baffled, and it takes me about half an hour into trying to get to sleep that night before I realize that the front pieces I used were for Pattern D, a vest that had a zipper all the way from top to bottom. I have to resist a face palm for two reasons: One, why didn't I pick Pattern C like I had planned to do in the first place? And Two, Who in the hell has ever seen a plain style vest with a zipper that goes from complete top to bottom?
 |
| It makes a world of difference. |
So the next morning I undo all the stitching and hope to salvage the front pieces and make them go from Pattern D to Pattern C. When I lay Pattern C over my piece I realize the only difference between the two is the collar size. The shoulders, arm holes, sides, and even bottom part are all totally unaffected. It's about that point I realize I didn't have to undo the stitching for a second time in order to cut out the pieces for the collar. I'm glad, though, because I don't have to make completely new front pieces.
Here's the actual difference between the two (I had already made the cut by the time I took the photos.)
 |
| Pattern D's collar |
 |
| Pattern C's Collar |
 |
| And then I realized I was following a pattern for a hat... |
So I make the cut and redid all the stitching. The problem with the woolly stuff on the inside is that it sheds like crazy, so right now the room I cut and sewn (and unsewn and cut again and resewn) the vest in has little white poof-balls on everything.
 |
| Oddly enough it's cheaper to pay a guy to stand here than to buy a mannequin. |
Luckily, I managed. It looks fantastic and hangs much better. It's got a warm, rustic look that you might actually expect a satyr or forest huntsman to be wearing. From here I'm wondering where to go with it. My brother is kind of hesitant to have buttons, but I'm thinking that we just need to find the right kind, I'm leaning towards some wooden ones, or a toggle. Rather than cut a hole in the fabric for the button to fit in, I plan to have a loop. Normally I make loops out of the same type of fabric, but it's not going to work with this stuff, so I'm thinking of using a really rough binder twine I have on hand. I have some dark brown silk ribbon, but I don't think it would work well with the theme I'm trying to keep here.
After that I'm thinking the vest needs decorated in some way, odds and bobs. It's one of those things that I won't know it belongs until I see it.
Thank you for such an informative post
ReplyDelete