Friday, December 20, 2013
See You Next Year!
Just like last year I will be taking a posting break until January the 3rd. Enjoy!

Friday, December 13, 2013
Burning Goats
So, being the holiday season, I decided to look up the holiday of Yule on Wikipedia. This led me to Yule Goat which, in turn, led me to the Gävle Goat.
I have never laughed reading a Wikipedia entry before.
Granted, I feel bad that people are having to rebuilt their goat figures, but when you see sentences to the effect of "Burned 3 days after erecting" and "made flame-resistant with guards patrolling around the clock. Burned 5 minutes later" it's pretty amusing, and when they break down the number built, burned, stolen, and hit by a car, giving it a survival rate, I lost it.
Viva la yule goat!
I have never laughed reading a Wikipedia entry before.
Granted, I feel bad that people are having to rebuilt their goat figures, but when you see sentences to the effect of "Burned 3 days after erecting" and "made flame-resistant with guards patrolling around the clock. Burned 5 minutes later" it's pretty amusing, and when they break down the number built, burned, stolen, and hit by a car, giving it a survival rate, I lost it.
Viva la yule goat!
Friday, December 6, 2013
Black Cats
"But Jennifer, you future New York Times bestselling author!" you say looking at the title of today's post, "It's past Halloween!"
This isn't about Halloween, though I will mention it briefly later on. Instead, the focus here is specifically on the color of a cat (and prepare for this to be the most heavily-referenced and sourced post ever, as I want to show I'm not just spewing out random information.)
I did a speech paper on black cats once and learned quite a bit in the process. Since then I've been even more of an advocate for the adoption of black cats.
“A 2002 study in the Journal of Applied Animal Welfare Science that examined adoption rates over nine months in a California pound found that black cats were about half as likely to be adopted as tabby cats and two-thirds less likely than white cats.” - From startseeingblackdogs.com
Go ahead, take a look a look for yourself at petfinder.com I was browsing there less than a week ago and the number of black cats there in comparison with any others is staggering.
Some of you at this point are probably asking why. Why are black cats so hard to adopt out?
Here's a rundown:
They Are Hard To See
Shelters can sometimes have poor lighting and, as a result, black cats get lost in the background. They're like the jokes people make about ninjas.
How to solve this? Easy, take a harder look in what you may originally thing are empty cages or, better yet, specifically ask about black cats. The staff at the shelter would likely be enthusiastic to show you who might be unintentionally hiding from you.
People Think They Are Bland
By bland I mean it in two ways. People want a cat with a more exotic-looking fur coat and, even worse, they think they will have a bland personality. Seriously, that's like accusing someone of being bland because they wore a plain T-shirt today.
I have plenty of anecdotal evidence to the contrary, but here's a video of one that has over 2 million views.
They Are Bad Luck

I really could just leave it at that, but the idea that black cats being back luck isn't exclusive. Some countries actually believe specifically black cats are good luck. Great Britain, Scotland, Japan, and many others (Germany is sort of halfway on the concept, believing right-left crossing is bad luck but left-right is good luck). Groups of people like sailors believed cats, specifically black ones, would keep them safe at sea.
No one really knows where the origin of black cats being bad luck came from. I've heard a large number of stores (one of which involves Vikings!) but while the origin remains fuzzy what really caused it to gain momentum was witchcraft. Even today people associate black cats with witches. To this day people still believe they're bad luck, I have a friend who's mom refuses to allow him to get a black cat because she believes them to be bad luck.
Hey, you know what happened last time we persecuted and murdered a bunch of cats? The Black Plague. But whew! Good thing we got rid of all those bad luck cats, it could have been way worse!
But in all seriousness if you are considering adopting a cat at any time in the future, please consider a black cat. Many shelters do keep people from adopting out black cats in October, as people have been known to "rent" them as Halloween decorations, returning them after the holiday (or much worse), which is why I bring this up in November instead.
There are shelters that have black cat adoption months, ask your local shelter. They might even offer you a discount right on the spot if you express enthusiasm!
And, most importantly, you'll be giving a home to someone who really needs it.
 |
| "Your mom is past Halloween," I reply in a mature manner. |
I did a speech paper on black cats once and learned quite a bit in the process. Since then I've been even more of an advocate for the adoption of black cats.
“A 2002 study in the Journal of Applied Animal Welfare Science that examined adoption rates over nine months in a California pound found that black cats were about half as likely to be adopted as tabby cats and two-thirds less likely than white cats.” - From startseeingblackdogs.com
Go ahead, take a look a look for yourself at petfinder.com I was browsing there less than a week ago and the number of black cats there in comparison with any others is staggering.
Some of you at this point are probably asking why. Why are black cats so hard to adopt out?
Here's a rundown:
They Are Hard To See
Shelters can sometimes have poor lighting and, as a result, black cats get lost in the background. They're like the jokes people make about ninjas.
 |
| Adorable, purring ninjas. |
People Think They Are Bland
By bland I mean it in two ways. People want a cat with a more exotic-looking fur coat and, even worse, they think they will have a bland personality. Seriously, that's like accusing someone of being bland because they wore a plain T-shirt today.
 |
| Gawd I bet her idea of a good time is pricing brands of cotton balls. |
They Are Bad Luck

I really could just leave it at that, but the idea that black cats being back luck isn't exclusive. Some countries actually believe specifically black cats are good luck. Great Britain, Scotland, Japan, and many others (Germany is sort of halfway on the concept, believing right-left crossing is bad luck but left-right is good luck). Groups of people like sailors believed cats, specifically black ones, would keep them safe at sea.
No one really knows where the origin of black cats being bad luck came from. I've heard a large number of stores (one of which involves Vikings!) but while the origin remains fuzzy what really caused it to gain momentum was witchcraft. Even today people associate black cats with witches. To this day people still believe they're bad luck, I have a friend who's mom refuses to allow him to get a black cat because she believes them to be bad luck.
Hey, you know what happened last time we persecuted and murdered a bunch of cats? The Black Plague. But whew! Good thing we got rid of all those bad luck cats, it could have been way worse!
 |
| There would be sexy witches everywhere! |
There are shelters that have black cat adoption months, ask your local shelter. They might even offer you a discount right on the spot if you express enthusiasm!
And, most importantly, you'll be giving a home to someone who really needs it.
Friday, November 29, 2013
Making the Satyr: The Legs
"Finally!" I'm sure you're all saying.
Here is how I made the legs. Most people who do the digitigrade legs have to accommodate for the foam. At this point my brother decided we were going to scrap the idea of digitigrade and just do regular hairy pants (I will explain how we managed to make them digitigrade after all in a moment). To make the pants without a pattern I just set down a regular pair of pants. Pants are tricky in the fact that you'd expect them to be just two diagonal tubes, but they're more complicated than that. Take a look.

So, using that as a guide (and a fabric pencil I had to sharpen after every two feet of marking) I managed to cut all four pieces of the fur.

Something to note about working with such a hairy fabric: it will make a mess. You will get hair on the floor, on your clothes, and everything else it touches. That's all before you even start cutting it. Make sure you have a lint roller and a vacuum cleaner handy (neither of which you should use on the fur fabric itself, just on what's shedding off)

Here is one of the legs sewn together. It looks long on the bottom and tall on the top, but ended up being perfect on the bottom and maybe a little short on top. I intentionally left part of the bottom unsewn (you can kind of see a V on the left where the foot is poking through) so there was more room and so that the pants can rest on the hooves better.
The pants ended up being surprisingly baggy. Enough so that we decided to bring back the digitigrade pillows and give them a try. We stuffed the upper front pillows from the top and the lower back pillows from the bottom (it takes two people to put the legs on). It's a tight squeeze but it also means the pillows won't slip out.
Overall, this is what we ended up with:

He is standing completely straight.
Perhaps in the future we will consider Velcro to attach the digitigrade pillows and an elastic band for the top of the pants, but for now it works very well for an attempt made with no previous costuming experience.
Here is how I made the legs. Most people who do the digitigrade legs have to accommodate for the foam. At this point my brother decided we were going to scrap the idea of digitigrade and just do regular hairy pants (I will explain how we managed to make them digitigrade after all in a moment). To make the pants without a pattern I just set down a regular pair of pants. Pants are tricky in the fact that you'd expect them to be just two diagonal tubes, but they're more complicated than that. Take a look.

So, using that as a guide (and a fabric pencil I had to sharpen after every two feet of marking) I managed to cut all four pieces of the fur.

Something to note about working with such a hairy fabric: it will make a mess. You will get hair on the floor, on your clothes, and everything else it touches. That's all before you even start cutting it. Make sure you have a lint roller and a vacuum cleaner handy (neither of which you should use on the fur fabric itself, just on what's shedding off)

Here is one of the legs sewn together. It looks long on the bottom and tall on the top, but ended up being perfect on the bottom and maybe a little short on top. I intentionally left part of the bottom unsewn (you can kind of see a V on the left where the foot is poking through) so there was more room and so that the pants can rest on the hooves better.
The pants ended up being surprisingly baggy. Enough so that we decided to bring back the digitigrade pillows and give them a try. We stuffed the upper front pillows from the top and the lower back pillows from the bottom (it takes two people to put the legs on). It's a tight squeeze but it also means the pillows won't slip out.
Overall, this is what we ended up with:

He is standing completely straight.
Perhaps in the future we will consider Velcro to attach the digitigrade pillows and an elastic band for the top of the pants, but for now it works very well for an attempt made with no previous costuming experience.
Friday, November 22, 2013
Making the Satyr: The Accessories
The best fabrications have detail, some so small that you never even see them, but if they weren't there you'd notice (take the Lord of the Rings movies for example). In my spare time while my brother was working and I had a few mornings off I decided to make a few small accessories. If you find yourself trying to come up with some ideas, or don't even know where to start, think more in the theme of the materials you will be working with. I wanted more natural materials, things you would find in the woods or could create from such things: leather, wood, and feathers. Bone and clay would work well if you have the ability to work with those materials as well.
The Bow and Arrows


To make the bow I chose a hemp cord, the string I've been using for previous things is far too rough and would cause the bowstring to look frayed. Hemp, however, looked to be the appropriate size and style. If I wanted it to look really nice I would have chosen some more expensive waxed cord I had seen.
My intention was to make notches on both ends of the dowel to hold the string in place. Making the notches with a knife causes the knife to dull too quickly and I was nervous with the idea of using a knife (if I can cut myself on a light switch twice I really shouldn't be trusted with sharp objects). Having just recently moved I was also lacking tools like sandpaper or a saw. However, I have used a nail file before to buff paint off a piece of metal using the logic that it's basically a form of sandpaper, so I decided to use that with some surprisingly good results and got the notch that I needed. Unfortunately, after several attempts at stringing the bow, the dowel broke.

I decided to reevaluate the bow and instead focused on the arrows. I bought a pack of feathers and cut them into the desired shape for arrow fletching (definitely a project you do outside) the dowels I cut to 2 feet, long enough to be convincing arrows and short enough that they wouldn't be awkward. Because they were cosmetic arrows I left out some details intentionally, like the notch the bowstring would fit into and even arrowheads. The arrowheads for two reasons: because the arrows would stay in a quiver and not even be seen, and so they wouldn't be considered a weapon (weapons and weapon-like objects in costumes are very much a safety issue to keep in mind)
I attempted to glue the feathers on with several types of glue, having poor results: the weaker glues aren't sticky enough for the feather to stick on while it dries, and super glue is too runny and has other disastrous problems (by wearing nitrile gloves I didn't glue my fingers together, but everything else became a runny mess that quickly dried into a crispy mess). I did scrap the idea of arrows, but only because the costume deadline was coming up, and I had other things I needed to do more. Only recently realizing I should have researched it before hand, a quick search brought up a very interesting website here that shows fletching by hand without a jig.
Although I didn't complete the arrows I did, however, halfway complete a quick and dirty quiver by gluing leather over a cardboard paper towel roll. I'll see about posting some pictures someday.
Vest Extras

Accessorizing the vest was what got me started on the details. My brother was nervous about buttons on the vest, wanting to leave it open, but after a year I think he got more comfortable with the idea of me adding to it. For the buttons I chose horn toggles. I've never been a fan of button holes as I want to be able to correct mistakes, and cutting holes are pretty permanent, so I use loops. The loops I used are made of a rough twine. Afterwards, I poked some small feathers under the stitching of the buttons, they hold together very well. There are three on the bottom and one on the top to help hide the tips of the bottom feathers jutting out.
Painting the Horns

Along with the quiver here is a list of other accessories I didn't feature here: headband, scarf, bracelets, loincloth, tail, and bottles.
The Bow and Arrows

After a quick trip to the craft store I picked up some dowels with the idea of making a bow and arrows. You'll notice the back-most dowel is actually thicker than the rest, this was to be the bow.

To make the bow I chose a hemp cord, the string I've been using for previous things is far too rough and would cause the bowstring to look frayed. Hemp, however, looked to be the appropriate size and style. If I wanted it to look really nice I would have chosen some more expensive waxed cord I had seen.
My intention was to make notches on both ends of the dowel to hold the string in place. Making the notches with a knife causes the knife to dull too quickly and I was nervous with the idea of using a knife (if I can cut myself on a light switch twice I really shouldn't be trusted with sharp objects). Having just recently moved I was also lacking tools like sandpaper or a saw. However, I have used a nail file before to buff paint off a piece of metal using the logic that it's basically a form of sandpaper, so I decided to use that with some surprisingly good results and got the notch that I needed. Unfortunately, after several attempts at stringing the bow, the dowel broke.

I decided to reevaluate the bow and instead focused on the arrows. I bought a pack of feathers and cut them into the desired shape for arrow fletching (definitely a project you do outside) the dowels I cut to 2 feet, long enough to be convincing arrows and short enough that they wouldn't be awkward. Because they were cosmetic arrows I left out some details intentionally, like the notch the bowstring would fit into and even arrowheads. The arrowheads for two reasons: because the arrows would stay in a quiver and not even be seen, and so they wouldn't be considered a weapon (weapons and weapon-like objects in costumes are very much a safety issue to keep in mind)
I attempted to glue the feathers on with several types of glue, having poor results: the weaker glues aren't sticky enough for the feather to stick on while it dries, and super glue is too runny and has other disastrous problems (by wearing nitrile gloves I didn't glue my fingers together, but everything else became a runny mess that quickly dried into a crispy mess). I did scrap the idea of arrows, but only because the costume deadline was coming up, and I had other things I needed to do more. Only recently realizing I should have researched it before hand, a quick search brought up a very interesting website here that shows fletching by hand without a jig.
Although I didn't complete the arrows I did, however, halfway complete a quick and dirty quiver by gluing leather over a cardboard paper towel roll. I'll see about posting some pictures someday.
Vest Extras

Accessorizing the vest was what got me started on the details. My brother was nervous about buttons on the vest, wanting to leave it open, but after a year I think he got more comfortable with the idea of me adding to it. For the buttons I chose horn toggles. I've never been a fan of button holes as I want to be able to correct mistakes, and cutting holes are pretty permanent, so I use loops. The loops I used are made of a rough twine. Afterwards, I poked some small feathers under the stitching of the buttons, they hold together very well. There are three on the bottom and one on the top to help hide the tips of the bottom feathers jutting out.
Painting the Horns

I already mentioned in a previous post this month about buying the horns. While the horns are gorgeously designed I have to admit I wasn't expecting them to be so pale. The picture on Amazon shows them as a tan brown, while the ones we received were as pale as my hands in this picture (and that's with my summer tan). I chose acrylic paint in the hopes that it would work on the polymer clay the horns are made of (I have no idea what either of those mean, I mention it in the hopes that someone more knowledgeable than me is currently stroking his beard going "Hmm, yes.")
Friday, November 15, 2013
Making the Satyr: The Digitigrade
This is it, the part that's a big mystery to everyone who wants to make a detailed satyr costume: The digitigrade legs.
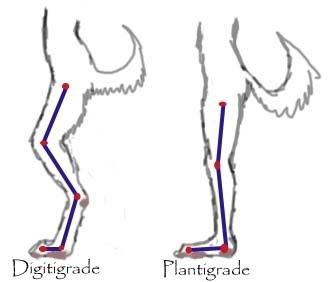
In comparison, humans have what are called plantigrade legs. We step with our entire foot, toe to heel. Digitigrade animals, meanwhile, step on mostly their toes, the heel of their foot extending upward before finally reaching their knee.
The problem with making a satyr costume is making plantigrade legs look like they are digitigrade legs. Some people have really elaborate metal leg brace systems that they end up balancing on, like stilts, others use foam to achieve the appearance. Massive metal stilts are very impractical, not to mention I don't have the resources nor the knowledge for such a thing, so I chose the foam method.
For the foam I chose a less rigid type than what most people use because it was cheaper and I felt would be easier to work with. To me it was more like layers of quilt batting than actual foam. They ended up being 16 inches long by 5.5 inches wide (I didn't measure the depth since I didn't think about it). I made four of them, two for the top front of the legs and two for the back bottoms. Keep in mind the person I am making this for is 6 feet tall.


In comparison, humans have what are called plantigrade legs. We step with our entire foot, toe to heel. Digitigrade animals, meanwhile, step on mostly their toes, the heel of their foot extending upward before finally reaching their knee.
 |
| I had to look at furries in the name of learning. |
For the foam I chose a less rigid type than what most people use because it was cheaper and I felt would be easier to work with. To me it was more like layers of quilt batting than actual foam. They ended up being 16 inches long by 5.5 inches wide (I didn't measure the depth since I didn't think about it). I made four of them, two for the top front of the legs and two for the back bottoms. Keep in mind the person I am making this for is 6 feet tall.

The original plan was to shape them into the desired curvature, but instead I decided to leave them square and put them into a tightly sewn section of fabric that would hopefully cause it to curve. It did, but was a pain to stuff, the action requiring the effort of two people.

Afterwards we taped them in place to see how it would look in terms of shape with the intent that we would later sew them to the green pants set aside specifically for this project.

I a later post, I will show you how it looks once the pants are finished and the padding put into place.
Friday, November 8, 2013
Making the Satyr: The (Failed) Hooves and Horns

Although I failed terribly at making hooves there's still a lot to be learned, and I hope that by making a mistake I can maybe help someone else end up one step ahead than they were before.
So, to make some hooves I've seen several videos. Going by what they were generally doing I decided to use some clay molded on top of som shoes my brother didn't want anymore. The clay I chose was a natural brown clay that air dries well.

I made sure to clean the shoes beforehand, put down some wax paper to protect the floor, and set to work, carefully pressing the clay onto the shoe. I've never worked with clay before, and I found it both easy and difficult to work with. Easy because it attached itself much easier to the shoe than I was expecting, difficult because it took a lot of pressing to get it to shape the way I wanted.

As I began working my way up the shoe I ran into a problem: When I reached the meshy section of the shoe (the area that lets your foot "breathe") the clay refused to stick to it. I found a workaround by attaching more clay on the areas that attached well and eventually built my way up, squeezing and shaping to get this (the middle cloven shape I achieved using a pen cap to shape it):

I also decided to attempt some horns, because I had plenty of clay left. Throughout the entire process the clay only got harder to work with and began to crumble easily. Within 24 hours the clay cracked, crumbled, and I was left with chunks of clay and stained shoes.
Instead I decided to save my sanity, throw money at the almighty Amazon, and buy some hooves and horns (the horns of which I am quite happy with, the hooves are a fair alternative to madness.)
What would I do in the future if I decided to attempt it again?
I would definitely use a wire mesh in the future, to provide the clay something to really stick to. I would also probably shop around to see about types of clay and what might work best in the situation. Most of all, however, I would definitely get a brother with smaller feet.
Subscribe to:
Posts (Atom)