Friday, November 9, 2012

Making The Satyr: The Vest

Rather than dive right into the legs of the satyr costume, I have decided, instead, to start from the waist up. That way, if I happen to fail on the legs, at least I will have made a passable hunter/ranger costume. Until that inevitability arises, I shall continue to call it the satyr costume. (Although a friend suggested I tell my brother to piss off and just go as Dionysus...tempting, but disturbing end result.)

With pretty much all satyr costumes they are either shirtless or with a vest and scarf. Here in Idaho it gets pretty cold, so I was thinking of making variations and layers to the satyr costume,  but for now, a nice fabric.


I arm myself whenever I go
to craft stores...or Wal-Mart
When we were pricing fabric for faux fur (say that three times fast) we found a fabric that is woolly on one side and smooth doe-like suede on the other. It would be like deer and sheep could have babies. Then we took those babies, ripped their skin off, tanned their hides, and wore them. So, after waiting until Sunday for the paper to come out I clipped my coupons and headed out a few days later.

Now, word of advice? Never pay full price for patterns. Patterns that cost you anywhere from $15 to $20 only end up costing $0.99 on certain sale days with a limit of 10 patterns per visit, and they have those sale days like candy. I like to look at patterns online, write the number down on a piece of paper, and then go to the fabric store and get what I want because, plainly put, any craft stores are Hell where old ladies and screaming children reside (I wonder, do the screaming children eventually cocoon themselves in quilt batting and emerge next spring as the old ladies?)


You can tell I'm totally stoked to do this.
Okay, so after arming myself with various blades and smoke bombs I head out and return with the vest pattern of choice and the sheep/Bambi fabric I had seen earlier (Shambi?)


This pattern is pretty simple (It's Simplicity 2346, in case you want to know.) Even the pattern packaging itself nearly screams "Even you can do this, you moron!" and I go "Woo! Failure!" and begin.


I have never made anything from total scratch. Usually I'll buy a pattern and then the fabric somehow cut itself into the desired shape, so that all I had to do was stitch it together. After fumigating for Fabric Elves I later realized it was my mom.
Which is pretty much what I say when a guy is close by.


Most of the time I work with darker fabrics, so this was a nice change. The instructions said to pin the pattern onto the fabric, but that stuff is thinner than onion skin, and I've always been afraid of tearing it. Instead I took a pen to the fabric and drew lines while the pattern lay on it. Unfortunately drawing on fabric makes the pen unreliable. It wasn't long before I had given up on it. Luckily I had some washable fabric-marking pens I had bought for an earlier project and used those instead. The whole time saying "Don't screw up don't screw up don't screw up."
 
And that's why I'm not God.


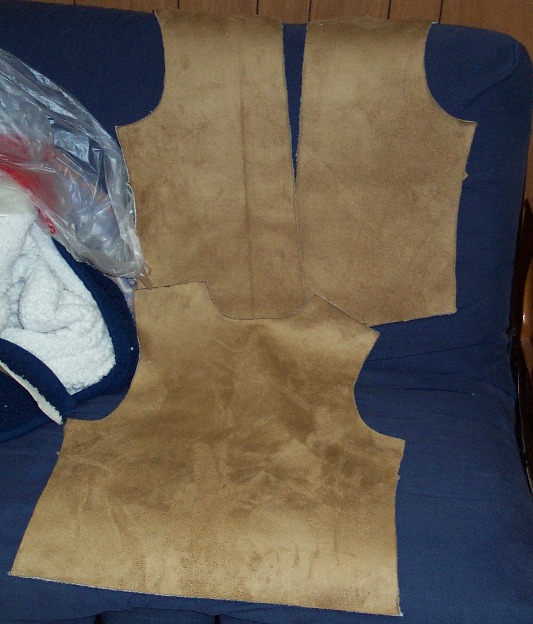
I managed to get the pieces all cut out, making absolutely sure I didn't accidentally draw down the middle of the backside vest piece. Even better, I found the grain of the fabric. The grain is how the fabric lays, and while I couldn't find it on the suede side, I found it on the woolly side, so when you pet it in a down stroke, the fabric lays in a downward-with-gravity-position. Without it, it would be weird, like imagine petting a dog and his fur lays so that you have to pet him from tail to head for the hair to lay right.


Like maybe a big square. Yeah, that
would be a great project!
Now, this picture here should give you an idea of how much of a noob I am at sewing. I have no idea how to read the backs of patters, where they tell you how much of what you need. Fabric, liner, bias tape, I can't read it. This huge chunk of fabric? I honestly thought I needed all of it. All of it for one vest. After cutting this one out it actually looks like I could make a total of three vests. Anyone who sews should be tearing their hair out right about now. Still, I'll see about finding some non vest-related project for the leftovers in the future.


From that moment on it haunted my
nightmares.
I first sew one of the shoulder pieces, make an awesome turn on my sewing machine, and promptly sew the armhole shut. It takes much longer to undo the stitching, and in the meantime I'm wondering how in the world I manage to even clothe myself in the morning. After redoing the sewing correctly I manage to put the whole thing together without another hitch. It took about three hours in total (an hour of which was trying to cut the pattern out of the paper and goofing off.) It looks amazing, but when my brother tries it on something doesn't feel right. The whole thing swings out wonky and there are the corners at the top where the front pieces come together at the center. I'm baffled, and it takes me about half an hour into trying to get to sleep that night before I realize that the front pieces I used were for Pattern D, a vest that had a zipper all the way from top to bottom. I have to resist a face palm for two reasons: One, why didn't I pick Pattern C like I had planned to do in the first place? And Two, Who in the hell has ever seen a plain style vest with a zipper that goes from complete top to bottom?


It makes a world of difference.
So the next morning I undo all the stitching and hope to salvage the front pieces and make them go from Pattern D to Pattern C. When I lay Pattern C over my piece I realize the only difference between the two is the collar size. The shoulders, arm holes, sides, and even bottom part are all totally unaffected. It's about that point I realize I didn't have to undo the stitching for a second time in order to cut out the pieces for the collar. I'm glad, though, because I don't have to make completely new front pieces.
 
Here's the actual difference between the two (I had already made the cut by the time I took the photos.)


Pattern D's collar
Pattern C's Collar


And then I realized I was following
a pattern for a hat...
 
 So I make the cut and redid all the stitching. The problem with the woolly stuff on the inside is that it sheds like crazy, so right now the room I cut and sewn (and unsewn and cut again and resewn) the vest in has little white poof-balls on everything.

Oddly enough it's cheaper
to pay a guy to stand here
than to buy a mannequin.
Luckily, I managed. It looks fantastic and hangs much better. It's got a warm, rustic look that you might actually expect a satyr or forest huntsman to be wearing. From here I'm wondering where to go with it. My brother is kind of hesitant to have buttons, but I'm thinking that we just need to find the right kind, I'm leaning towards some wooden ones, or a toggle. Rather than cut a hole in the fabric for the button to fit in, I plan to have a loop. Normally I make loops out of the same type of fabric, but it's not going to work with this stuff, so I'm thinking of using a really rough binder twine I have on hand. I have some dark brown silk ribbon, but I don't think it would work well with the theme I'm trying to keep here.
 
After that I'm thinking the vest needs decorated in some way, odds and bobs. It's one of those things that I won't know it belongs until I see it.


Thursday, November 8, 2012

More Jewelry

I took some more pictures of my jewelry to show, as well as some of my materials. Sadly, I know that it's probably getting girly and boring for half my audience, so I will be mixing in some manly things between the girly jewelry subjects.


The far left are some gear earrings I got at a place called Claire's. I had been looking for a pair to go with a Steampunk outfit I've been slowly working on over the course of a few years. These ones were perfect. I'm not much for large earrings, and these are nice and small. They were originally stud earrings, but my ears are sensitive in the fact that I can't wear something in them for five seconds before they turn a warm lobster red, spew pus everywhere, and want to fall off (that's a bit of an exaggeration, they don't so much "spew" as "ooze"). So I clipped off the stud part, added some jump rings, and attached some hooks that are more comfortable and kinda sorta don't really match. (The teeth of the gears still get caught in my hair, though.)
 
Second are probably the pair I'd have to say got me started. I found a great set of five, various size wings at Walmart, and these are the medium-sized of the bunch (there were two smaller and one big.) I really wanted to make a pair of wing earrings for a friend for a long time because we both love Maximum Ride so much. I got these, made some, then had some really tiny cherub wings leftover and the big, single wing. I made the single large wing into a charm for a single-string drawstring bag for her and then used the cherub wings for earrings for her little sister. I loved how my friend's wings turned so much that I bought a second set, made my own earrings from the medium size, the large wing into a necklace, and the cherub wings together as a matching necklace for the little sister.
 
Typical earrings from Claire's

The bronze-looking wings are also from Claire's. What I like about that store is that they have tons of earrings and they're always huge and ridiculous and have a whole bunch of crap hanging off anywhere from 3 to 10 lengths of chain. I'll buy a couple, tear them apart, and use the clusters of one earrings to make a whole bunch of less crazy earrings instead. These started out as a bunch of small bronze chains with three of each wing dangling per earring. I  brought it, took it apart, and used just the wings as three individual pairs of earrings.

The blue ones are I think silicon of some sort (I can't remember) and actually pretty lightweight and sturdy, I picked them up for about 10 to 15 cents apiece and added the rings and hooks to them. They were a little tricky because the holes in them are really small so I needed thin rings. I had a darker blue pair and some black ones, both of which I gave to a friend.
 
YEAH LET'S GET SOME MANLY EXPLOSIONS IN HERE! I'VE GOT SOME STEAKS ON THE GRILL COOKING FROM SHEER EXPLOSIONS!! KNOW WHERE I GOT THOSE STEAKS!? I FOUND THE MEANEST, UGLIEST BULL COW OUT THERE AND KILLED IT WITH MY BEAR HANDS BEFORE DRAGGING ITS CARCASS BACK TO MY MONSTER TRUCK!!! I THEN DROVE THROUGH EXPLOSIONS TO GET TO MY BARBECUE GRILL AND BODYSLAMMED THAT COW DOWN ON IT TO COOK!!!!   !!
 
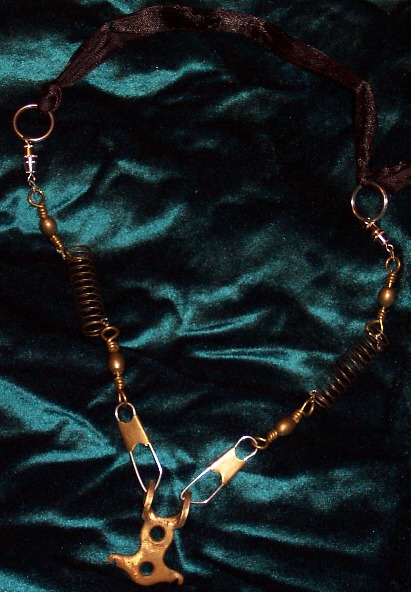
The necklace on the left in this picture is the largest wing from that wing charm pack, and the one on the right is actually a piece from a wind-up clock that I had taken apart a number of years ago. I'd have to say that one was my first Steampunk necklace before I made the Junklace.
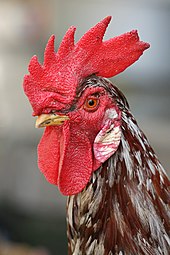
It was around this time that the feathers-in-hair fashion craze started up. I thought they were interesting, but at the same time didn't want to look like I got into a fight with a bird. And lost. So I thought feather earrings would be the better way to go. Feather earrings are really expensive, though, so I decided to go ahead and make my own since, well, we have chickens running around and feathers dropping everywhere.
It's more complicated than just slapping some feathers together. Each one has its own size and shape, and I wanted two that were the right shape, size, and color. That wasn't easy and it took me a long time to gather just the right two (making sure to clean them well, of course.) They still didn't feel organic enough, though, so I looked at some pictures online and decided to go with a three-feather style, salvaging some chain material from the bronze three-wing earrings I had split apart. These ones are much more natural in their movement.
 

I DIDN'T WAIT FOR SOME STUPID CHICKEN TO DROP FEATHERS. I DECIDED I WAS GOING TO TAKE WHAT I WANTED!!! SO I FOUND THE BIGGEST, MEANEST-LOOKING CHICKEN IN OUR FLOCK AND I PUNCHED HIS COMB OFF WHERE IT EXPLODED!! THEN I RIPPED HIS FEATHERS OFF AND SHOVED THEM IN MY EARS! THEN I THREW HIM AT MY GRILL WHERE HE LANDED AND BECAME DINNER! YEAH!!!
These are some of my first earrings because I had really wanted some wing earrings. These were really heavy and had these long, dangling pieces of chain on the ends. I just wanted plain wings, so I detached the chain-bunch from them and buffed off the rings on the bottom. It was a mistake, though, since it would have been better to buff off the top rings, invert the wings, and wear them upside-down like you see for most pairs. Because of my mistake they're unbalanced and look weird, so I don't really wear them anymore since making my other wing earrings. Still, I like the craftsmanship and detail in these better, so I hope to someday figure out how to make new rings where I had buffed off the old ones. The grouping of chains floated around in my jewelry box for a long time until I got some earring hooks and made them into some simple earrings, themselves.


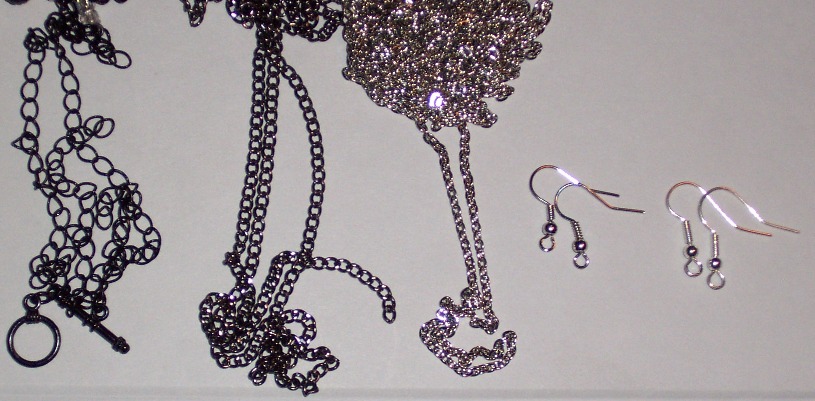
When making jewelry, metal choice is important. I have here 3 different colors that some people would just call "silver." On the far left is a black chain for comparison. Next is a dark silver or grey-ish silver, which I had bought and later realized it was too dark. The next one was the right color silver I needed, though I like the chain of the middle one the best.
 
The earring hooks are also there to show an even lighter color of silver. The hooks on the left match the chain next to it and are my favorite for crafting because they don't hurt my ears at all. The ones on the right I had bought and realized the silver color was too bright, plus they are a cheaper material and hurt my ears really bad, so I will probably just throw them away in the future, they're that bad. On the left here are those same earrings, plus two different bronze-type earring hooks. I bought the bag on the right for my gear earrings and realized they were the wrong color, so I had to go back and get the bag on the left. Seriously, when you're making jewelry, take the piece you're working with to reference the color you're looking for.
 
YEAH! EVERYBODY LOVES ZOMBIES!! I RAN INTO SOME ZOMBIES WHEN I WAS AT THE GROCERY STORE! SO I WHIPPED OUT MY SHOTGUN THAT I ALWAYS KEEP WITH ME WHEN I GO TO THE GROCERY STORE FOR JUST THIS VERY REASON! THEN I BLASTED THEIR FACES OFF! THEN, SUDDENLY OUT OF NOWHERE ONE GRABS MY ANKLE FROM BEHIND THE INSTANT RICE SO I SMASHED ITS FINGERS AND THEN BLASTED ITS TEETH RIGHT OFF! AFTER THAT I RANG UP MY PURCHASES AND RAN OVER MORE ZOMBIES WITH MY COW-STAINED MONSTER TRUCK  ON THE WAY HOME AND HAD SOME RICE-A-RONI!!!
 
Charms, findings, pendants, I'm not really sure if there's a difference in the name. I just call it the centerpiece of the jewelry. They're the most important part of the jewelry, the part that people will be looking at and what you will base the rest of the piece on.

Most come in multi-packs and most of the time you want only one. These are all ones that I haven't found a use yet that I got as a pack when I wanted one in particular. The wing hearts came from the wing-charm sets, and I honestly have no idea what to do with them since I'm not a big fan of hearts and the hole goes through the top and bottom part of the heart, like a bead, so they can't work at a centerpiece for a necklace.

You can do more with charms (/findings/pendants, etc etc) than just make them into jewelry. Perhaps one of my favorite uses are bottle-neck decorations. The tallest bottle is a small wire of glass beads with a simple metal cross. I wanted it to look a bit like a rosary. It's way too tiny for a necklace or even a bracelet, but it's perfect for a bottle. the smaller bottle on the right is a rock charm I've had forever and only recently found a use for it.

Of course, sometimes you have the exact opposite problem, you have a project idea but can't find exactly what you're looking for. You'll see some of my smaller project ideas in my next post.


Tuesday, November 6, 2012

Jewelry Crafting

The Junklace
I started writing because I couldn't find the exact story I wanted, the same holds true for jewelry. I'd made a couple of things here and there in the past, starting with my my Steampunk Junklace and then, when I had two crosses from a failed project (was meant to be a gift but the execution totally fell through because I had no idea what I was doing) so I made a gothic ribbony necklace with some scrap lace I had laying around that is barely long enough to make a comfortable choker.

I couldn't find the exact wing earrings I wanted, so I made my own. That was when I was surprised to find the metal was quite comfortable, was really inexpensive, and the creation of it was downright fun, so now the majority of what I own is handmade.
Attracts vampires with the fancy lace, then repels
them with the cross while I stake them. I love a
good bait-and-switch hunting jewelry

I've made quite a few other pieces since then, building up a small dragon horde of findings and metals and glass beads. Most of what I made is pretty simple, just hook earrings with a simple fob on the end, but I also have dreams of making elaborate jewelry for costumes. I also love to make jewelry as gifts for friends.


Ostentatious.
This third necklace and earrings set was tricky. I had most of the pieces put together, but was struggling for a centerpiece. Anything I found that even looked remotely good with the theme I had was usually too large.

I then started thinking less red and black and began focusing on which to match with the bottom gems of the earrings. Finally, I also realized it didn't exactly have to be a centerpiece, rather a piece to a pattern. I had some small, white glass beads that would match perfectly and then they just sort of came together in the pattern.

The outer pieces look longer when held up, but lay more even with the rest of it when worn, which was what I wanted. This necklace was also meant for a friend, but it, too, fell through (for different reasons) and now it just collects dust because it's too ostentatious to wear with anything I have and, even if I did, my whole ensemble would be too ostentatious to wear anywhere I go (I like that word.)

Expect some more pieces in my next post (don't worry, gentlemen, I promise a post of nothing but awesome manly things someday soon.)

Saturday, November 3, 2012

Making the Satyr

As I mentioned in my last post, my brother and I are planning on making a satyr/faun (both words and interchangeable) costume for him. This would be much easier if I were a witch. I could just sacrifice a couple of goat-virgins at midnight, direct some negative energy or somesuch, and bam, my brother turns into a satyr every full moon.

What I hope to achieve [Found here]

Instead I will be doing some sewing and sculpting.

It's pretty tricky since there aren't any actual sewing patterns of one to be found anywhere, and I want to be a good quality. Some of the most simplistic just have furry pants but both me and my brother want to have something that actually creates the illusion of the shape of the goat (deer?) legs, called digitigrade. Even trickier than that, though, will be the hooves, I'm betting.

We've been looking at some people's works online, and so far the best ones use foam to create the digitigrade. Most satyr costumes involve high-heels with the heels cut off. I have no idea how women walk in high heels, much less high heels with the heels cut off. A friend's sister of mine went as Betty Crocker one year with heels on and only managed to walk about a quarter of a block before taking them off and going barefoot. Like a culinary hobo.

"Today I will be serving up a
delicious Pigeon Pot Pie."

For my costumes I like to make things not only functional, but comfortable. All of my cloaks are heavy-grade fabric, and when you put one on, you feel it resting on your shoulders. The first cloak I made I was about ten years old, and when I put it on I had an "oof" feeling until I was about sixteen. I say all of this because running around in heel-less shoes is not only uncomfortable and illogical, it's also downright silly (plus no self-respecting man would ever run around in heels...except maybe Tim Curry) As such, I will be attempting to make a flat-heeled version because when people wear costumes they're generally at parties or conventions, both of which involve a lot of walking and I suspect not a lot of ladies keep that in mind when they design their satyr feet.


A wild satyr found sipping from a gentle stream
of beer can. [Found Here]
Anyway, for my own project I'm keeping it pretty simple at the moment. I have to quash down the dreams of doe-skin vests and other accessories until I complete the primary part: The legs and feet. Generally the feet (hooves) are separate from the legs. While I had initially suspected the feet would be the most complex, I'm starting to suspect the digitigrade of the legs will be harder, and since I only have the materials for the feet at the moment, that's what I'm going to do first.

Every single tutorial I've seen have the hooves built into a pair of shoes, either nailed, glued, or stapled into place, but the problem is that Dex (my brother) is really picky about shoes, so I was thinking about trying to design hooves that can slip onto various pairs of shoes. This link has the best one that I will probably be basing the hooves off of. I have some plain, brown clay that air dries, rather than having to be fired in a kiln or something (I honestly have no idea what the hell I'm doing, I've never sculpted before and I think I last had Play-Doh in my hand when I was six). Once it's dry I will probably use some paint to add a hoof-like color and texture, then varnish the crap out of it, and glue on some fur.

Doesn't sound so bad, in theory, right? The problem I'm having is what to have as the structure that I'm going to slap the clay on. One tutorial suggests wire mesh, but I think my parents would be fairly upset if I started slicing through our window screens. Instead I am leaning more towards a plastic base, and will probably sand it to allow the clay to adhere to it better. If it still falls off, glue has been my best friend for many years (super glue has been my fingers' worst enemy, however.) After that figuring out how to allow them to attach to any pair of shoes should be easy. I'm thinking of something like a strap with a buckle, or Velcro.

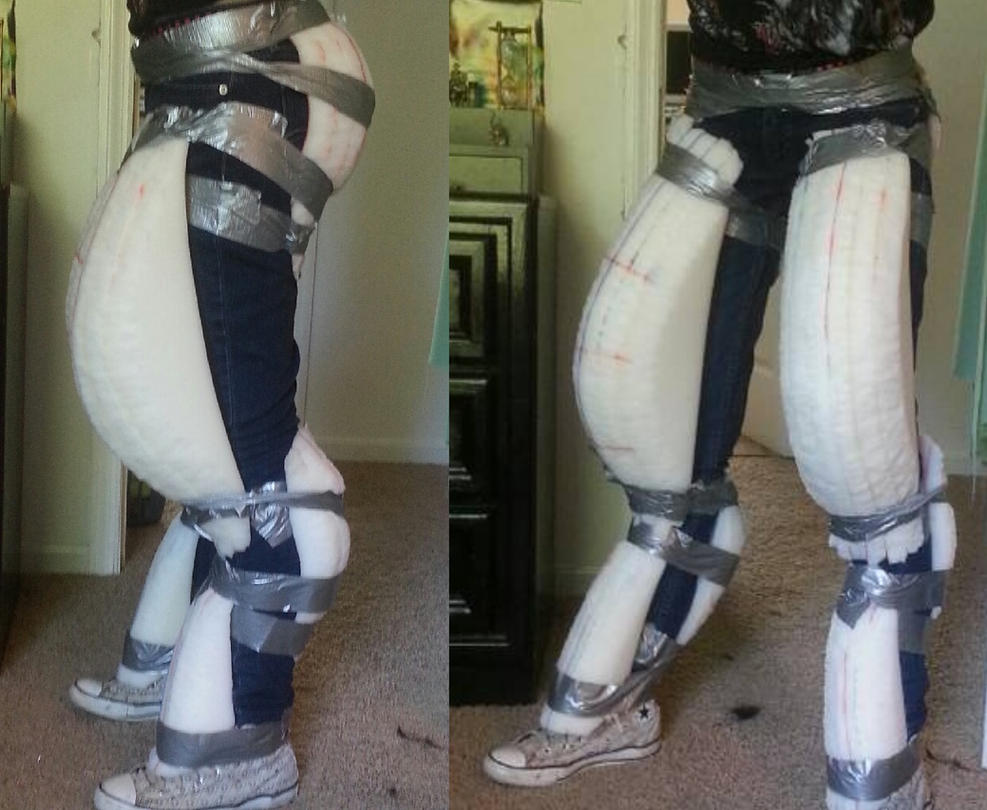
After that I'll be working on the legs (pants). We have some foam, but I'm mostly working with what we have laying around the house. I'm hesitant about the legs because faux fur is really expensive, I have no pattern, and I will only have one chance to do this right. At the moment I don't even have any fur, so I plan to build the digitigrade structure and then probably get the fur. My base will be a pair of self-titled "lounge pants." They've never been worn because they're a rather dubious shade of green.

Only after all of that has been accomplished can I dream of doe-skin vests and other accessories.

Wish me luck!


UPDATE December 2013: Hey everyone, this is my most popular post, and since you all seem interested in everything Satyr check out the complete costume I made (along with how I made it) at these other posts:

Making the Satyr: The Vest

Making the Satyr: The Flute

Making the Satyr: The (failed) Hooves and Horns

Making the Satyr: The Digitigrade

Making the Satyr: The Accessories

Making the Satyr: The Legs


 For those of you looking to make a costume of your own I highly recommend The Digitigrade and The Legs postings.


Friday, November 2, 2012

Hahaha! No.

Well, looks like even that schedule went down the drain. In record time, too!

Here's what I've been up to (in no particular order?)

A brand-spanking new novella! I've been in a bit of a motivation slump and have had it nagging me at the back of my mind, so I decided to give it a whirl in the hopes that it would rekindle my writing habit. I'll see about posting a preview sometime.

Sewing. I like to dabble a bit with sewing, but I'm not particularly good at it. I have no idea how to use a pattern, though I have been hand-sewing since I was about eight years old. I have a new sewing machine, which tries to kill me an awful lot less than the old one my parents have, though I did find a finely-embroidered assassination contract with my name on it sealed inside the box. What's up with that?

Some of my most recent projects have been stuffed animals (which, considering their quality, would make children cry). Right now I've got a pretty ambitious one of making a satyr costume for my brother for next Halloween. Expect details in a post tomorrow about my plans.

Jewelry. I love making my own jewelry. For the price of even a really cheap pair of earrings I can buy the materials for making some and make about 20 different pairs. The metals are also much more comfortable. With the exception of one pair of gold earrings I own I have changed out every single pair of hooks in all of my earrings to the more comfortable craft ones (jewelry-crafters, you know the ones I'm talking about, with the single ball of metal and the swirly thing on the hook). I'll see about showing some of my results for those, too.

It be mah vakash... vaka...vuh... It be mah time off.

A medical terminology class. It's actually been rather fascinating. So far my favorite word is blepharoptosis, which, for all its complex glory, means a drooping eyelid.

My parents had a 3 week vacation time in early October, which was fun. We don't generally do stuff like go on a cruise ship to Ireland, or some such. Rather we all like to stay home, pop the top off a beer, and stroke our shotguns while staring menacingly outward at anyone who happens to pass by.


With Halloween came a huge slew of updates to a bunch of my favorite games: Team Fortress 2, Minecraft, Mabinogi. Poor, poor Deus Ex has been gathering dust for a while now, and I've been itching to play it. Though I have, by now, forgotten all the controls and will probably revert back to a bruiser rather than the sleek, stealthy approach I was initially aiming for.


I am probably the only person ever to have a
hillbilly and Adam Jensen in the same post.
Free books! I'm a cheapwad, and after one free Kindle book sucked me in, I've been checking their best-seller freebies every 2-3 days ever since. I don't have a Kindle reader (or any e-book reader, for that matter), but I did sit down with my laptop and read one. I was pretty blown away with how impressive it was, being an indie author (hurr durr, that's some big talk, coming from myself)

Probably the most distracting of all, however, is Valve's Source Filmmaker. I have always wanted some kind of program that an idiot like me can use. Lo and behold, Valve obliged (they pretty much own most of my soul, at this point) and gave me something simple enough that I can use it, but complex enough that it can be used to create some really impressive stuff. Within just an hour or less I had already made a simple video and, within a week, I was fulfilling my animating dreams.

I'll leave you with one of my favorite videos (you don't even need the context of the game to enjoy it. It's like watching a Pixar short.)

Thursday, October 4, 2012

The Book of Night With Moon


I think someone is using a can opener back there.
The Book of Night with Moon by Diane Duane was one of my first books (if not the first). When I was young I was way into cats, and here was a book about cats! It was published in 1997, so it predates Erin Hunter's Warrior Cats series by 12 years.

It was about a group of cats who's job was to maintain portals between worlds in New York. They also had their own language, which I loved. It's been a long time since I've read the book, but I  still remember some pretty cool parts, like at one point a T-Rex somehow ends up tromping around the city, and eats an opera singer. The cats have to patch correct pieces of timeline (like minus the T-Rex) to fix the problem. It's actually pretty unique, and a pretty treasured book on my shelf.
Lookin' weirdly proportioned there kitty.

It is most definitely standalone, but a sequel was made, called To Visit the Queen (On Her Majesty's Wizardly Service, in the UK). I didn't know there was a sequel for an incredibly long time, and only found it by chance at a library when I was looking for Duane's Young Wizards series (which The Book of Night with Moon is a spin-off of). To Visit the Queen is seen as a Steampunk book because, through time-travel, Victorian Britain is given access to high-technology. I spent years looking for the sequel, and only a year or two ago managed to find one.

Probably one of the best things about the series is that it doesn't totally hang on the fact that the main characters are cats. You could probably replace the cats with humans and have an equally good story, but the cat element is what makes it unique.


Wednesday, October 3, 2012

New Blog Schedule

Yeah, I didn't think I'd be able to last long on the 5 days a week schedule. So here's the shiney new one! Dusted Glen will be updating Tuesdays and Thursdays and the type of post will probably be a bit random. Oddly enough I'm finding myself coming up with more writing post ideas and fewer personal ones.

And if I miss any? Look at it this way: I've got a huge new writing project, and that's what's been keeping me from posting.